http://www.avrfreaks.net/index.php?name=PNphpBB2&file=viewtopic&p=1117516 and
http://code.google.com/p/arduino/issues/detail?id=181&can=1&q=watch%20dog
The good news is: optiBoot boot-loader has corrected this issue, full stop! Optiboot is the default boot-loader shipped these days in the Arduino UNO, and why I had no problems until I switched from 5v to 3.3v (and had to select a different board which supported 3.3v and 8Mhz).
The Bad news was though optBoot came in almost any configuration you wanted, they only precompiled a hand full:
I've reduced the pre-built and source-version-controlled targets
(.hex and .lst files included in the git repository) to just the
three basic 16MHz targets: atmega8, atmega16, atmega328.
Well, no more! Last night I was poking around the the optiBoot gethub repository site (http://code.google.com/p/optiboot/) and with release v5 they have pre-compiled a bunch more configurations!
Ha! Half way there! Remember, optiBoot is the default bootloader for the Uno, and all we need to do here is use a 3.3v of optiBoot to get the same benifit of Watchdoog support. And to top it off, we gain about 1.5K more of programming space as optiBoot is MUCH smaller then the legacy boot-loaders!
All right, how to make use of it? Here is what I did, I added the 3.3v / Atmel328 optiBoot variant to the existing bootloaders (as opposed to just replacing them all). This way I can still support any legacy boards, while having the optiBoot version as well.
The following steps are for WinXP and Arduino IDE 1.0.4:
Step 1: Locate where your personal sketches are placed.
For me this was: C:\Documents and Settings\Al\My Documents\Arduino\
Step 2: If it does not already exist, create a new director called 'hardware'.
Step 3: Change to this new directory.
Step 4: Now create a new director called 'Optiboot'
Step 5: Change to that directory. You should be in something like:
C:\Documents and Settings\Al\My Documents\Arduino\hardware\optiboot\
Step 6: Download the zip file: "optiboot-v5.0a.zip" from the "Arduino Libs Used" tab above, or this URL:
(http://code.google.com/p/optiboot/) (If you use the URL, make sure the version downloaded
contains all the optibook variants compiled, not jsut the 3 common ones..)
Step 7: Open the zip and copy all the content into the new optiboot directory you created in step 5.
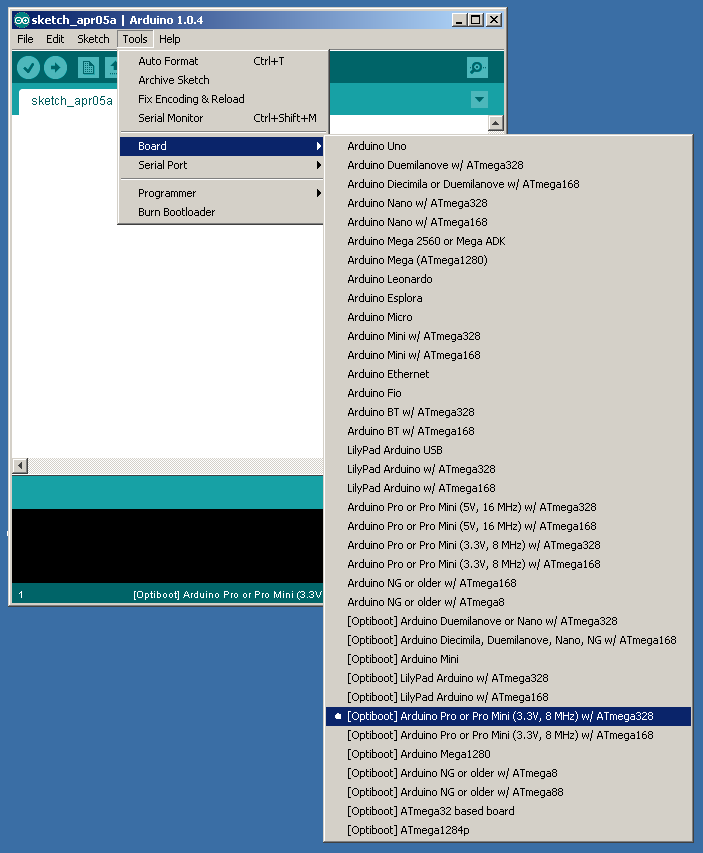
That is it! Restart the Arduino IDE and under the tools/select board menu you will now see:
There you go! See that Arduino Pro or Pro Mini (3.3v, 8Mhz) w/ATmega328 can now be selected using the the legacy bootloader, or you can pick the new Optiboot one (as shown).
In use you need to select the bootloader you wish to use when flashing it in (See: http://arduinoalternatorregulator.blogspot.com/2013/12/33v-boot-loader-for-arduino.html ) and make sure to pick the SAME board when uploading sketches.
There you go! Not only do we get to support 3.3v, the watchdog, and we got more programing space. What is there NOT to love??
(Well, as long as we are adding target environments, how about this one: http://highlowtech.org/?p=1695
Mini Arduinos!!!)
No comments:
Post a Comment
Note: Only a member of this blog may post a comment.